Saturday, April 30, 2011

Beautiful spring day - a new look


It was a beautiful spring day today. I took the dogs for a long walk and afterwards they had a nice snooze in the back yard. Taz was trying hard to keep his eyes open here, but was sleeping a few minutes later.

Some time ago, we decided to replace the glass on the front door to update the look of the house, so today was the day. I purchased the replacement glass yesterday.

This is the BEFORE photo. This door was about 3 or 4 years old but we thought the glass was a bit old fashioned. We replaced the house number in December and the old door glass didn't really complement the look we were trying to achieve.

Replacing door glass isn't difficult - the box on the new door glass says it takes 20 minutes but that really is an understatement. The first step was to remove the old glass which was quite easy so I started by popping out the the plugs in the screw holes, removing the screws and then taking the glass out. The last part was the hardest because the caulking held the glass in place really well.

If you look through the window on the right, you can see Freda working in the yard.

The old door lights were two tall skinny pieces and the new door light is rectangular, so I had to cut out the middle piece from between the openings. That took about 30 seconds total - it took longer to get the tool out.

After that, it was fairly straight forward to install the new door light. The plugs for the screw holes were a bit tough to put in, but I was able to do that with a small piece of wood.

This is the after look. We think it looks a lot nicer.

Wednesday, April 27, 2011

Furniture rearrangement and a mucky puppy


A couple of friends came over yesterday and helped us take the tv downstairs, and also rearrange the furniture a little bit. This is what the living room looks like now - unfortunately I don't have a 'before' photo. However, 'before' - the tv was on the right where the leather sofa is - that was on the left in front of the window. The sofa on the left was actually standing up on its end (on an arm). There was also a love seat that was moved to the 'office' where I have my computer set up. The two chairs and the other furniture that is in the living room will stay there, although they will be rearranged.

We couldn't get any of our furniture downstairs as it was too large (escept for two chairs), so we purchased a condo-sized sofa and a loveseat. They go well with the colours in the room. The installer from Shaw (formerly Star Choice) came today and hooked up the satellite dish.

We had the dogs off leash a bit when we took them out for their walk this afternoon. Of course, Tawny found the muddiest puddle so she was a real mucky puppy! She looked like she was in blackface, and it was quite funny. She is much much cleaner in this photo.

Sunday, April 24, 2011

Stairs are completed

So, it's time to install the stair treads. To do that, I will glue the treads then put a nail in each corner. As Louis is coming to pick up his brad nailer on Sunday, I need to do this on Saturday night.

This is the last you will see of these stairs. One of the stairs had a slight crown on the tread so I had to sand it flat. Then I swept and vacuumed the stairs to get rid of all the dust so the glue will stick well. You can see the tread for the top step is sitting on the landing ready to be installed.

This photo was taken after all the treads were glued and nailed. I put a piece of paper along the back of the each tread and the carpet below the bottom step, in case any excess glue dripped down. I used all sorts of heavy things to weigh the treads down so they would stick well.

Installing the treads would make the stairs temporarily impassable, so I had to do this at night when we were finished going up and down the steps.

I removed all the heavy items and cleared off the steps. A few drops of glue dripped onto some of the paper so I was glad that I had put that down.

We think the stairs look gorgeous! They are a huge improvement over the previous steps and I am very glad that I put the maple treads down instead of just painting the old treads. Another plus is that the treads are about an inch deeper than the old steps which makes it much more comfortable to walk up and down.

The treads cost about $34 each, plus the stain and the varathane, so it came to about $150 plus taxes.

This is what the room looks like now. Louis won't be able to help any more, which is lucky since I just have a few things left to do. Louis has picked up his tools so now the room is almost completely clear except for the shop vac and my tool bag (by the rightmost post).

PS: You can see that the stitching software didn't do really well with the post on the right.

Friday, April 22, 2011

Thursday update

It's been a long and busy week. I am (mostly) taking the weekend off, except for cleaning! :)

Trim and baseboard around the front entrance has been caulked and painted twice. The doors have been installed, except for the guide at the floor and the trim piece in front of the sliding door hardware. This is a "medium duty" door hardware, and it slides really nicely. It costs about 4x the "light duty" stuff you can buy at the orange box store. I couldn't really use that since I wanted to hang a real door panel from it and that was too heavy for the light duty stuff.

The back door steps and landing are finished. The box of Coca Cola was there to prevent the door handle from bashing the wall - I have since installed the door stop and that is now gone.

The bifold doors for the pantry are installed. I need to complete installing the trim pieces around the door - only one piece is left to install and it needed to be cut down. I left that as it was too late to be running the saw as Freda had gone to bed.

The shelf supports in the closets have been painted and the shelves installed. The rod has been installed in the coat closet. Most of the doors have been painted once. I will install the door knobs after the second coat.

This is what the basement looks like now. Most of the tools and the construction materials are now gone. The floor can use another sweeping (or two, or three!) and the stair treads need to be installed as well.

Wednesday, April 20, 2011

Getting-Close Wednesday


The first thing I did this morning, was to go to the building supply place and purchase four maple stair treads to cover the steps coming from the back door landing down to the lower level. I had been planning on just painting the stairs,but when I saw how nice the floor was at the landing and the lower level, I realized that just painting those utility-grade stairs would really detract from the beauty of the what we had done. So, even though I had already bought the paint for the stairs, I went and got the maple stair treads. The treads have been stained in this photo, after being sanded twice.

The new baseboard by the landing received the first coat of trim paint - one more to go (tomorrow!).

The closets have now had their shelf supports installed. They were primed later and will be painted green tomorrow.

This photo is just to show the somewhat chaotic workshop look to the lower level. It will be nice when it is all cleaned up.

The maple treads that I bought to cover the old steps have a rabbet on them that is 9 inches deep. The current stair treads are 9 1/2 inches deep, so I am putting a piece of half inch plywood in front of the existing risers to fill the half inch space. The plywood I had was rough on both sides, so the first thing to do was to sand it, then put wood filler on the knots or any divots on the wood, then sand it after the wood filler had dried. This photo was taken after the 2nd sanding.

In this photo, the plywood has been installed in front of the existing risers, and I am painting them with primer. I am almost finished that as only the bottom riser (just below the brush) has to be primed. I have to paint the front of the existing stair tread as part of will be visible.

This is an off cut from the new maple stair treads. Maybe you can see that it only covers up about half of the thickness of the existing treads.

And here the stair treads (and the nosing for the kitchen have received their first coat of satin varathane. As you have to wait 8 hours after staining, I just did this before making this blog entry. I did this so that the 2nd coat of varathane can go on on Thursday morning and then I can install the stair treads in the evening.

Louis putting the casing around the door, so it matches the rest of the house. Whoever replaced the door used baseboard for the casing. It looked a bit off but now looks much better

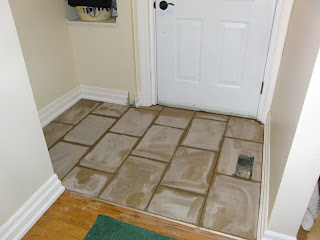
After putting the casing on, Louis grouted the tile at the entrance. The grout had been cleaned off the tile once but needs to be cleaned again, after it dried.

Tuesday, April 19, 2011

Front entrance tile


Louis came over today and the first thing to do was to rip up the old entrance linoleum (it was VERY slippery if your shoes were wet) so we can put down the tile. Here Louis has laid out the Ditra uncoupling membrane. This is used to prevent cracks in the tile, which is great. It is expensive, which is not so great, but it can save a lot of work in removing and replacing cracked tiles - and that is great too.

Here the Ditra has been installed and Louis is laying out the tile pattern, and cutting the tile at the same time.

Here the tile has been set in the mortar bed. You can see the tile spacers between the tiles.

Afterwards, I wanted to install the bifold doors, but I forgot that we had to cut them down to fit - oops! We cut a piece off the top and bottom of the doors, and then had to glue in a plug. We used two pieces of wood to make up the 1 1/8" gap we had to fill. I glued the pieces of wood together, then put glue on both sides of that and slipped it into the gaps at the top and bottom of each piece of the door. Once that was done, I put some clamps on the doors to make sure the glue does its job properly.

Monday, April 18, 2011

Trimming out the back steps

Now that the lower level room is almost complete - it only needs a 2nd coat of paint on the trim, the doors, and then the door handles installed - I decided to tackle the trim on stairs and the landing by the back door.

The first thing I tackled was taking care of the edge of the kitchen flooring. From the landing, you could see the drywall edge, the plywood subfloor, and the edge of the flooring. I purchased a piece of clear maple stair nosing, so that I could cover up the edges so everything was nice and finished. I chose maple because our kitchen cabinets are maple (natural finish), and it will co-ordinate well.

The first thing to do was lay out a straight line and cut out the piece of flooring - which has been done as you can see in the above photo.

I had an audience, when I was doing this work, as you can also see.

I had to remove the plywood subfloor, which was accomplished using a knife, chisels, and a circular saw to make a rough cut near the edge of the piece I needed to remove. As I removed a number of screws that fastened the plywood to the subfloor, I screwed the exposed subfloor down, as well as putting screws in at the edge of the plywood (since I removed the fasteners).

I am lifting up the edge of the flooring here to show this.

This photo shows an offcut of the stair nosing, marked up with a pencil mark of how I needed to change it. I was originally just going to but the nosing up against the flooring, but realized that it would look ugly if I wasn't able to cut the flooring perfectly. Since that would be difficult to achieve, I decided it would be better to cut a rabbet at the edge of the nosing so it would overlap the flooring slightly. Of course, this meant I had to extend the rabbet near the edge side so it would fit over the drywall. This is okay, because it means that, if we decide to install a short railing here in the future, there will be a nice wide piece of maple that we can fit the posts onto.

I had to remove the piece of baseboard on the abutting wall, as you can see. You will see it again later.

Here is the nosing off-cut after I cut the rabbets. I used my router table to do this.

So now the nosing has the proper rabbets so it now covers the unfinished edges of the drywall and the flooring. Now it's time to cut it to length and put the rabbet on the end (to cover the flooring there). But before I do that, I see that the length marking on the end of the nosing is visible. So, before I cut the nosing to length, I will cut a sliver off this end so the marker is not visible.

This photo shows what the landing looks like with the baseboard and shoe molding in place, against the nosing. It looks pretty good, if I do say so myself. This was a bit finicky, as you can guess. I still need to cut the quarter round to put at the edges of the flooring on the landing and the stair treads.

This is a photo of what it will look like when it is all finished. The aluminum stair nosing is just set in place for the photo, it isn't screwed in yet.

This detail photo shows what the stair nosing looks like at the top of the stairs. I put a 45 degree bit on the router to ease the edges on the nosing. I also had to trim about half an inch off the edge of the aluminum nosing - now it fits perfectly! Besides looking very nice, the maple nosing is a safety device too: the slightly raised nosing will feel different under your feet which will give you an indication that you are coming near the edge.

I plan on screwing the maple nosing down for a permanent installation. In order not to detract from the beauty of the wood, I will drill holes for the screws, and then use a plug cutter to fill in the holes, cut off the excess wood from the plugs, then sand and finish the nosing.

This is the detail of the stair nosing where it butts into the wall. You can see that I had to ease the bottom of the baseboard here to get it to fit nicely against the nosing.

What's left to do to complete the trim out in this area:
  • install baseboard from landing at top of stairs to lower level, caulk
  • install quarter round on landing and stair treads, caulk
  • paint trim around landing, need two coats
  • install maple nosing, cut off plugs, stand, and finish
  • install aluminum stair nosings - the ones for the steps can be put in as soon as the painting is finished.

Saturday, April 16, 2011

Saturday update


Taz didn't get the memo. The mops didn't work to keep him off the leather couch, so we put other things there - cushions, boxes, etc. Guess that didn't work either!

Dale came over and helped with a variety of things today - mostly he painted the trim, which can go quite quickly but is tiring because you have to be careful all the time. He was painting for about 9 hrs I think, but we did have a few breaks in there, for lunch and then supper too.

The trim in the pantry has now had two coats of paint, and the shelves have been fastened in. All that is left is to install the bifold doors, but I am going to paint them first.

This is a panorama stitch of 5 photos. This photo shows that the trim in this lower level has been completely installed, caulked, and at least one coat of paint on it.

Today was a short day -- only 11 hrs because it was a weekend. I am so exhausted and tired of the 12-14 hr days.

Friday, April 15, 2011

Friday update


Nobody could come over on Friday so I spent the day returning excess materials (we had two extra boxes of flooring) and finishing the stair nosing. I applied two coats of stain and two coats of satin varathane. This photo was taken after the first coat of stain was applied.

Thursday, April 14, 2011

Thursday update


Eric came over on Thursday morning and we got started by moving the tools over onto the finished floor so we could lay down the 1/2" styrofoam on the rest of the floor. This is a 6' span so we had to cut it to fit and then tape it down.

The closet is done and the book shelf nook is almost finished.

This pano was taken in the afternoon after Eric left and we did a clean up.

Louis came over after supper, and you can see from this photo that most of the baseboard trim is installed.

The casing is installed around the doors.

I am exhausted from these 12-14 hour days.