This is the dining room, with a view of the lake.
I don't think I've posted a photo like this before. This is a million dollar view.
I also realized that I had never even taken a photo of the solarium without the mound of rock that was Mount Berry, or something like that. So this photo shows the general layout of the solarium. What a pretty room!
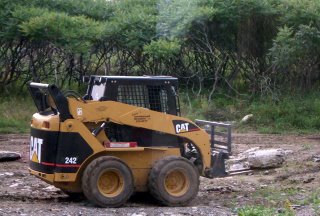
Jason, hard at work in his little Bobcat, taking a rock to the front flower bed, for some texture.
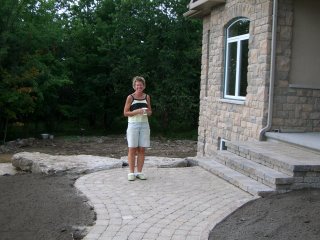
Freda is very happy with the new pathway!
This is a house blog once again. It is also an occasional dog blog, flower blog, and bird or other creatures blog...
Monday, July 31, 2006
Thursday, July 27, 2006
Wow! That looks fabulous!
The guys doing the fireplace are Portuguese, and they are still upset about how Portugal was robbed at the World Cup!
Here, one guy is buttering the back of the brick and installing it. The other guy is cutting them as fast as guy #1 can mark them.
UPDATE: the guy in the photo here is Joe, and his son is "the other guy".
This is the armour wall. You saw it on page 14 or 15, I think. The black stuff is some excess landscape fabric.
Update: Huh - what does that mean: "You saw it on page 14 or 15, I think"??? I obviously wrote that when I was tired. :^))
You can see what the armour wall looks like from the porch on the July 25th blog entry.
This is the finished fireplace.
All we can say is "Wow!"
Joe and his son are coming back tomorrow to redo / repair the parging.
Wednesday, July 26, 2006
Finally! The fireplace finishing starts!
The stone, that we have been waiting months for, for the fireplace finishing arrived a couple of weeks ago. We were starting to get worried that we hadn't seen any action. This was partly due to the fact that Charles head guy, Dave, had caught a serious virus and was laid up for over a week. Charles found some other guys to install the stone. It looks pretty good so far!
The only concern - and there always is one, isn't there! - is that Charles (or David) had told me that they were going to put a thin piece of plywood on the floor to provide a gap (so the floor could easily move) and support the stone at the same time. When the mortar dried, they would remove the plywood. There is no plywood or other spacer here between the floor and the stone which makes me wonder if this might cause future problems with the floor buckling. I hope not! We've had several lifetimes of headaches and hassles over that already!
Ooops!
This morning Cammy was working the shovel, and backed a little too far over the edge, with the result that the shovel fell backwards down the little cliff and the shovel unit detached from the tracks. Since the shovel unit basically is held onto the tracks by gravity, there is not a big deal to put it back together. Except for the fact that it is heavy, of course!
Tuesday, July 25, 2006
Landscaping is in progress!
We have not had been able to use our front door or our laundry room door because we have not had any steps to them. The landscaping has now started, and a key part of that is the "armour wall", which is a wall made up of big chunky stones, as you can see here. We are fortunate as we had lots of these on site.
In fact, several friends and come out (some making several trips) to pick up stones for their landscaping. One couple hired a guy with a dual-axle truck to take two loads of stones (the size of these ones) to their property.
Here is the finished armour wall, looking down on it from the porch in front of the front door. We had just had a good rain, so I didn't feel like getting my feet all muddy to take a good photo of the wall. I will do that in a few days.
Freda is going to have a rose bed between the two steps. The pathway is going to be a bit more curvy than you can see here. We also hope to have river rock on top of the dirt, to help keep the pestilential diseases off the roses.
Done with the floor
Finally the floor is done.
Umpteen kazillion phone calls later.
Three point eight seven million broken dates later...
Seven hundred and fifty six thousand dings on the wall later...
Oh, but always a big mess to clean up.
But it is done now. The floor is flat once again and hopefully will remain so forever.
Umpteen kazillion phone calls later.
Three point eight seven million broken dates later...
Seven hundred and fifty six thousand dings on the wall later...
Oh, but always a big mess to clean up.
But it is done now. The floor is flat once again and hopefully will remain so forever.
Monday, July 24, 2006
Satellite update
Google has updated their satellite images of the Jiulia Lake area. The satellite image is now in high resolution mode, and this one shows our house in construction phase sometime last year.
However, it do find it quite odd that the little photo (bottom right) that shows where you are relative to a larger area is from the old satellite images.
Sunday, July 23, 2006
Bird identified: Juvenile Male Rose-Breasted Grosbeak
On July 12th (Save the Birds) I posted about an unfortunate bird that smacked into our window and killed itself. I had never seen this kind of bird before and asked what it was.
Some friends of Freda's suggested it was a female Rose-Breasted Grosbeak. Armed with that information, I googled for that bird but none of the descriptions for the female RBG said anything about red under the wing, so I didn't think that was it.
My mum talked to a Naturalist at the John Janson Centre in Edmonton, who identified it as a juvenile male Rose-Breasted Grosbeak. I googled some more and found some really good pictures at this archival page A Glut of Grosbeaks from Hilton Pond Center, SC (US). The juvenile male RBG has similar head and breast colouration as the adult female, except it has red under the wings whereas the adult female has yellow.
Thursday, July 13, 2006
Colour me surprised!
Well, Mike was supposed to come this morning at 8:30am to fix the floors. He just called at 7:30am and said that he can't come today, and cna he come on Saturday.
I think this guy has only ever showed up on time once. At least he had the courtesy to call this time instead of just not showing up.
Wednesday, July 12, 2006
Save the birds!
The landscaping for the ponds is proceeding well.
Here Cameron (L shovel) and Steve (R shovel) are competing with each other in the Shovel Olympics. :))) Actually they are just smoothing out the dam around this pond.
Unfortunately, we have found a few dead birds around the house. This one was on the deck outside the great room. What a shame!
Note the red flashes under the wings - if you know what kind of bird this is, please email or leave a note in the comments. I think it eats seeds because of the shape of the beak.
According to flap.org, birds fly into windows and kill themselves because they can't see the window and think they have a clear path ahead. The best prevention is to have drapes. We weren't going to get drapes in the dining room, but have decided that we are going to get some kind of sheers to reduce the hazard to birds....
But what to do about the feature window in the great room??? In order to attempt to protect the birds from flying into the glass there, we taped up some silhouettes of flying birds. This is supposed to be mostly ineffective, according to the Toronto Humane Society web page.
flap.org (Fatal Light Awareness Program) talks about a film that can you apply to the exterior of the window. This costs US$3/s.f. so is a bit costly.
If you have any cheaper ideas but still esthetically nice, let us know.
Waiting and Delays.. (Day 461)
That's the order of the days... and weeks, it seems.
Still waiting for some sub-trades to come back and correct their deficiencies. Still waiting for the builder's crew to come back and remedy the deficiencies they are responsibile for. The builder is waiting for the replacement doors to come in (won't be in until August) and the stone for the fireplace finishing (also anticipated in August).
The flooring guy is coming tomorrow to correct the levitating floor. It's a floating floor and was installed too tight. And I just discovered last week, it was installed with a slight skew to it, so it is not square to the house. Fortunately it isn't really obvious. I told the flooring guy that he can take off whatever trim he needs to, but it has to look exactly like it looks now -- which is pretty darn near perfect!
The landscaper who is installing the "armour wall" and stairs to the front and laundry room doors was supposed to start the "first or second week of July". Now it is the middle of next week which is the third week of July.
Needless to say we are exhausted from having trades people pop up at random moments with no obvious plan to get things completed.
Thursday, July 06, 2006
Remedying the deficiencies
On June 22nd, I did a walkaround with Charles to create the list of deficiencies that need to be remedied. This list of deficiencies is part of the Ontario New Home Warranty Program - which is administered by a company called Tarion. (You have probably already noticed that Tarion is an anagram of Ontario - very clever. hah!)
One of the things that had been irking us for quite some time was that there was no indicator on the HRV controls if the HRV was On or Off. In other words, I could go into one bathroom, and push the HRV "On" button to activate the HRV before having a shower. If you went into the other bathroom and did the same thing, you would have no idea if the HRV was on or not, and pushing the "On" button might actually turn the unit off! This problem was caused by the HVAC installer running 2-conductor wire to the controls, instead of the 3-conductor that it needs to support the indicator light as well as the switch.
Back in May, I had a meeting with Luc, one of the owners of the HVAC company, and he tried to tell me that the HRV and controls were working how they were supposed to. I quickly proved to him that it did not. Last week he was trying to get "turn" timers, that would work with 2-conductor wires. I told Charles that mechanical timers were not acceptable as it is no longer 1970, and Charles passed that along.
This was finally remedied on Wednesday, July 5th, 2006 (Day 455).
On June 20th, a guy from the HVAC company came and fixed the leaks in the plumbing of the heating system. (Look at the May 29th blog entry for the description of the issues.) Luc had blamed "something in the water" for the rust, and I said that I thought it was bi-metallic corrosion. Guess what? The original installer had not put sufficient teflon tape on the treads of the pipe joining the copper pipe to the iron fitting. This means it was bi-metallic corrosion.
Tuesday, July 04, 2006
Rainy weather & the deck
I was off work last week so you know what that means -- rain every day, you say? Well, you are right!
This is what the sky looked like one evening after the pre-requisite rainshower. Quite beautiful!
My sister Rachel came to visit last week. When going for a walk the first evening, we discovered all this gorgeous slate beside the excavation of a house that is being built two lots over. We spent much of that first evening collecting some spectacular specimens for use as a walkway.
I estimate there is at least 3,500 lbs of rock in this little pile.
One of the major things that Rachel helped with was the construction of the deck. In this collage you can see (top->bottom, L->R): (a) deck blocks set out and leveled, (b) start of framing, (c) first joists installed, and (d) second row of joists mostly installed.
Another collage:
- Freda & Rachel installing the blocking
- the deck frame with the blocking installed
- rain on the partially decked deck
- more rain after about 1/4 of the decking was installed.
Rachel worked very hard helping me with the deck frame. Framing the deck is the hardest part and while you can do it by yourself, it takes more than twice as long to do it yourself. A second pair of hands makes the progress much much faster. Rachel was the second pair of hands in the deck framing and I couldn't have made this amount of progress with her hard work. Thank you so much, Rachel!
More rain. See the backyard has been levelled.
More rain after about 1/2 of the deck was completed.
Subscribe to:
Posts (Atom)