Post recovered by Kevin! Many thanks, Kevin!!
Here's something a little puzzling to amuse you for a minute... (You need to have Flash installed.)
Thursday, July 14, 2005

A construction joke
Post recovered by Kevin! Many thanks, Kevin!!
A guy at work told me this joke yesterday:
Q. What's the one question you can ask to find out if a construction project is over budget and behind schedule?
A. Have you started yet?
Hahahah - ouch, the truth hurts!
A guy at work told me this joke yesterday:
Q. What's the one question you can ask to find out if a construction project is over budget and behind schedule?
A. Have you started yet?
Hahahah - ouch, the truth hurts!
Sunday, July 10, 2005
Day 65 - ready for the concrete pour #2 (basement walls)...
Post recovered by Gerry! Many thanks, Gerry!!
Friday June 10th, 2005

The scaffolding system. The string is to align the walls, keep them straight. The scaffolding reminds me of the battlements on castles, specifically the parapet...

Looking at the garage and master bedroom suite from the rear.

The Hambro steel joists
Friday June 10th, 2005

The scaffolding system. The string is to align the walls, keep them straight. The scaffolding reminds me of the battlements on castles, specifically the parapet...
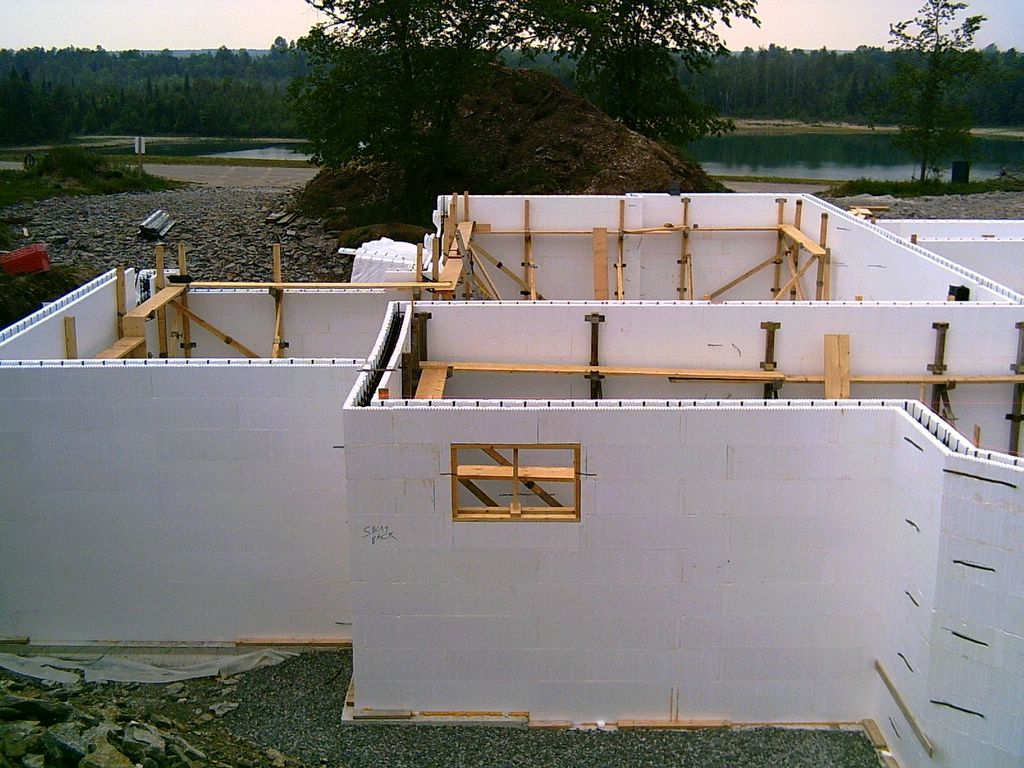
Looking at the garage and master bedroom suite from the rear.
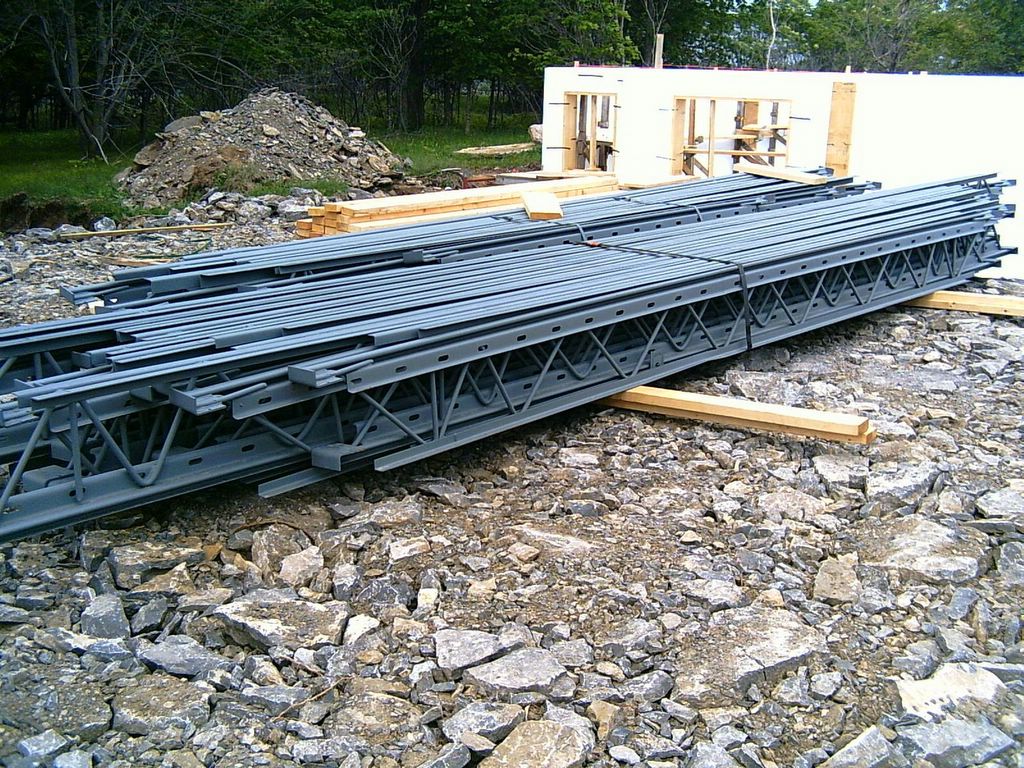
The Hambro steel joists
Friday, July 08, 2005
Day 92 - Installation of Wirsbo tubing
Post recovered by Kevin! Many thanks, Kevin!!
 Tawny found this water within a minute of us arriving at the land. This water is in the trench by our well. It was really funny watching her frolic in the water, sticking her head under the water to get the Kong, etc.
Just a quick reminder - you can click on any photo to see it full size.
 Friday was a hot day, but not brutally hot (unlike the forecast for the coming week) as there was a nice breeze. Freda made some shortcakes and prepared some strawberry shortcakes for the crew (L-R: Chris, Dave, Steve) as a little break in the afternoon. These guys were slathering on sunscreen liberally when working on the foil bubble wrap, but Steve got a sunburn around his eyes as he didn't have any sunglasses.
 Here the sheets of wire mesh have been wire-wrapped together already. Now Chris is fastening the Wirsbo tubing, for the radiant heating, to the mesh. Chris bends a straight piece of wire around the mesh and the tube, hooks the two circles on the end of that wire onto the tool, and a few quick turns of the wrist - presto, the wire is tied off neatly.
 Here Dave is measuring out the run of the Wirsbo tubing. Each run must be no more than a total of 300 feet. Hey Wirsbo, here's a suggestion to reduce installation time -- print a thick band around the tube every 10 feet, then measuring the length of the run would be a simple matter of counting the thick bands.
 Here is what it looks like when the heating tube installation is completed. This shows the heating tubes that are installed in the master suite and part of the kitchen.
 Tawny found this water within a minute of us arriving at the land. This water is in the trench by our well. It was really funny watching her frolic in the water, sticking her head under the water to get the Kong, etc.
Just a quick reminder - you can click on any photo to see it full size.
 Friday was a hot day, but not brutally hot (unlike the forecast for the coming week) as there was a nice breeze. Freda made some shortcakes and prepared some strawberry shortcakes for the crew (L-R: Chris, Dave, Steve) as a little break in the afternoon. These guys were slathering on sunscreen liberally when working on the foil bubble wrap, but Steve got a sunburn around his eyes as he didn't have any sunglasses.
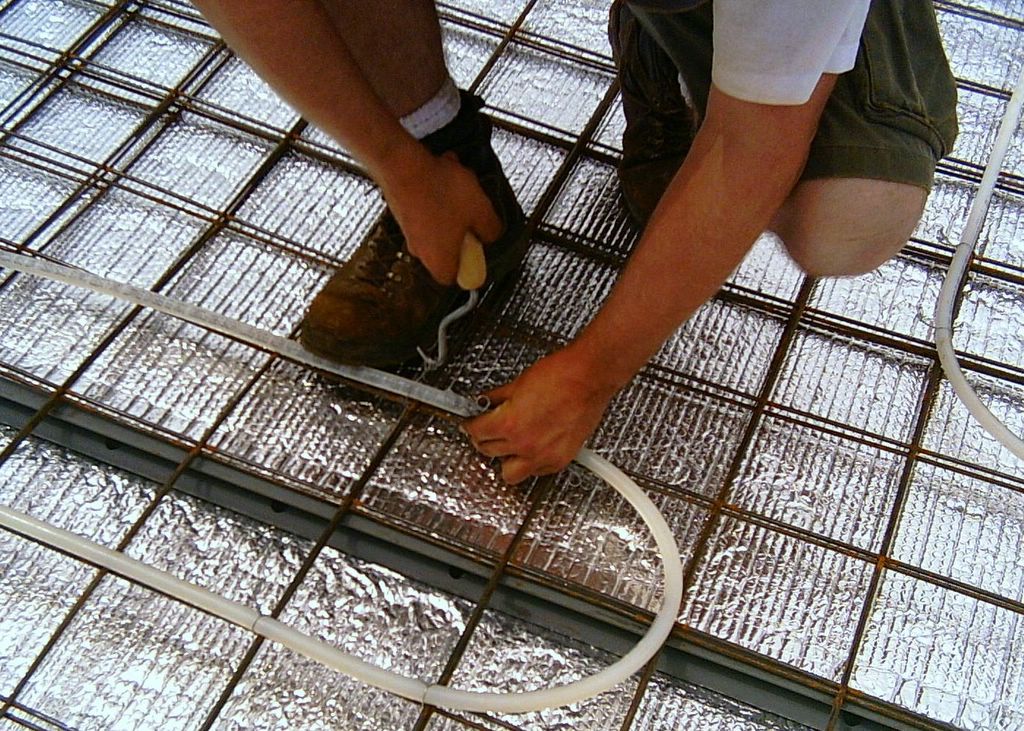 Here the sheets of wire mesh have been wire-wrapped together already. Now Chris is fastening the Wirsbo tubing, for the radiant heating, to the mesh. Chris bends a straight piece of wire around the mesh and the tube, hooks the two circles on the end of that wire onto the tool, and a few quick turns of the wrist - presto, the wire is tied off neatly.
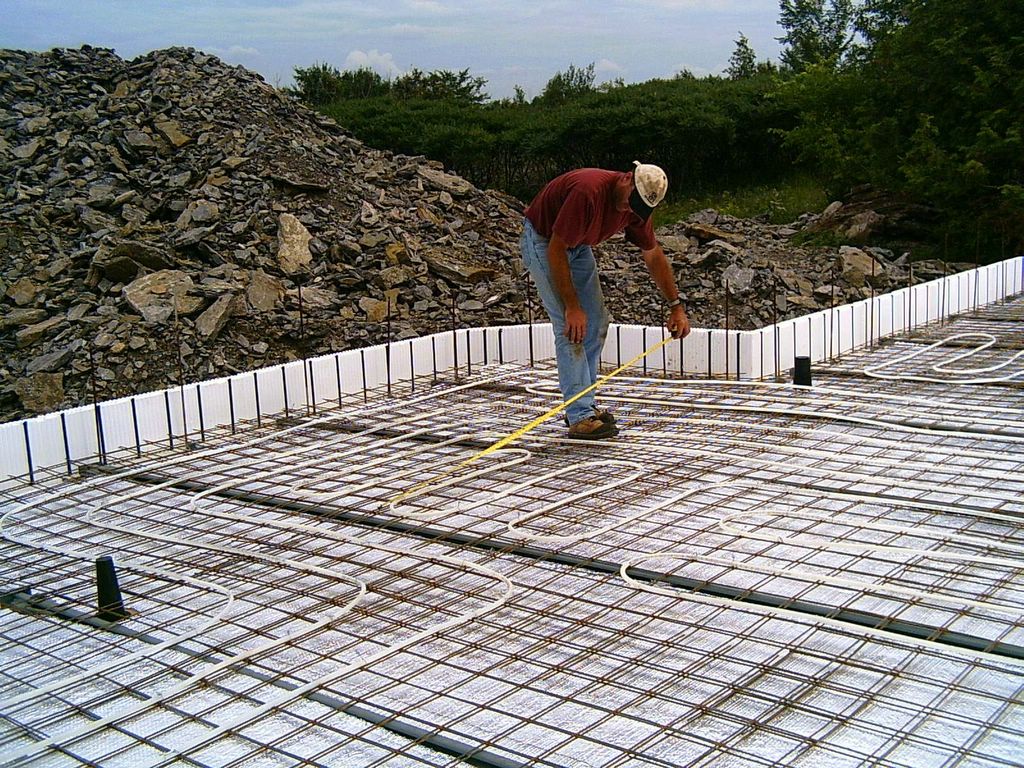 Here Dave is measuring out the run of the Wirsbo tubing. Each run must be no more than a total of 300 feet. Hey Wirsbo, here's a suggestion to reduce installation time -- print a thick band around the tube every 10 feet, then measuring the length of the run would be a simple matter of counting the thick bands.
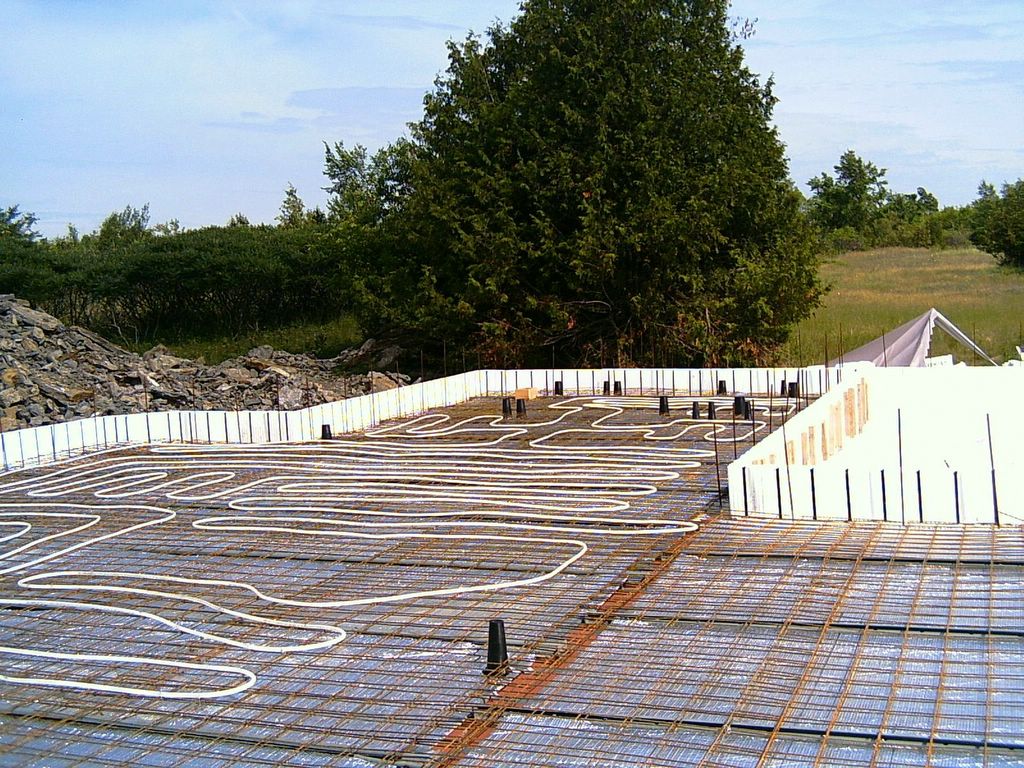 Here is what it looks like when the heating tube installation is completed. This shows the heating tubes that are installed in the master suite and part of the kitchen.
Wednesday, July 06, 2005
Day 90 - Installation of boots and bubble wrap insulation
Post recovered by Kevin! Many thanks, Kevin!!
 This is a view of the main floor with the reflective foil insulation partially installed, and the "boots" (the black cones) installed for the plumbing. A double layer of the wire mesh will be installed and tie-wrapped together, and then the Wirsbo tubing will be fastened to it. The electrician will be coming on Friday to install the boots he needs for the electrical, etc.
It was really surprising how effective that reflective foil is. It was a decent day - not too hot - but if you stood on top of the foil bubble wrap, it instantly felt like it was about 10 degrees hotter!
 This is a photo of the crew preparing to put the wire mesh down. Steve, for example, is tucking the foil backed bubble wrap between the plywood and the steel joists. This is so the concrete will not stick to the plywood at the edge and to help seal that joint to prevent any leaks.
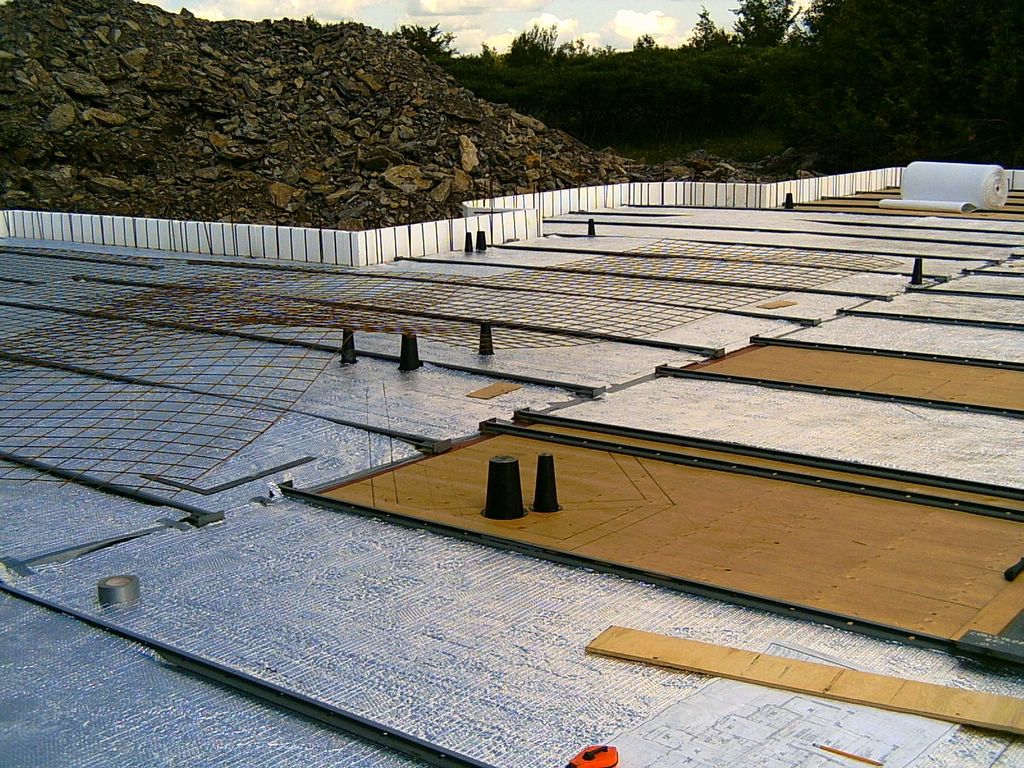 This is a view of the main floor with the reflective foil insulation partially installed, and the "boots" (the black cones) installed for the plumbing. A double layer of the wire mesh will be installed and tie-wrapped together, and then the Wirsbo tubing will be fastened to it. The electrician will be coming on Friday to install the boots he needs for the electrical, etc.
It was really surprising how effective that reflective foil is. It was a decent day - not too hot - but if you stood on top of the foil bubble wrap, it instantly felt like it was about 10 degrees hotter!
 This is a photo of the crew preparing to put the wire mesh down. Steve, for example, is tucking the foil backed bubble wrap between the plywood and the steel joists. This is so the concrete will not stick to the plywood at the edge and to help seal that joint to prevent any leaks.
Tuesday, July 05, 2005
Day 89 - schedule revisited...
Post recovered by Kevin! Many thanks, Kevin!!
We've had several cracks at the schedule (the last time being day 42, May 18th). According to that view, the truss installation would have been completed on June 28th. Given that the prep work for the main floor is still in progress, that is clearly not the case.
We sat down today and worked out the plan with Charles. We need to know the construction schedule in order to negotiate a closing date with any buyer for our current house. If the construction schedule does not follow this plan reasonably closely, then that could cause us a major problem.
So this is now the plan:
Well, now we shall see...
Finishing early is likely not a problem. Coming in late, however, would be a major problem, especially if we sell our house with a mid-January closing date.
We've had several cracks at the schedule (the last time being day 42, May 18th). According to that view, the truss installation would have been completed on June 28th. Given that the prep work for the main floor is still in progress, that is clearly not the case.
We sat down today and worked out the plan with Charles. We need to know the construction schedule in order to negotiate a closing date with any buyer for our current house. If the construction schedule does not follow this plan reasonably closely, then that could cause us a major problem.
So this is now the plan:
- now to July 13th
- Prep for main floor pour: install boots for electrical, plumbing, etc; install and tie double layer of wire mesh and Wirsbo heating tubing (more than 5 billion feet installed). In the basement, complete and inspect subfloor services (plumbing) in preparation for basement floor.
- July 15
- Order trusses (need 50% deposit)
- July 14-22
- In basement, install Insultarp over crushed rock, single layer of wire mesh, and Wirsbro tubing, pour concrete (pump hose will go through stairwell hole.
- July 25-27
- Complete backfill and rough grading, make plans to get rid of excess fill material.
- July 28-August 12
- Install ICF walls on main level.
- August 15-September 2
- Install wall plates (on top of walls as prep for trusses). Install trusses with hurricane ties, and roof sheathing installed. (The plywood we are reusing for the roof sheathing will cover about half the roof.)
- September 6
- Start shingling and interior work
- September 12
- Start installation of interior partitions and rough-in for mechanicals (electrical, plumbing).
- September 23
- Shingling complete, window and door installation complete -- now ready to drywall. After this, the exterior finishing work can proceed independently from the interior. This includes the following activities: installation of stone, stucco, soffits/fascia, septic, etc.
- September 26-30
- Pre-drywall inspections and final touches (e.g. sound insulation around bedrooms, laundry room, and bathrooms).
- October 3-21
- Install drywall. "Prime check" around Oct 19/20 to ensure no obvious issues with drywall installation. There is no stipple on the ceilings, so imperfections will be easily visible.
The cabinet supplier can come in and take final measurements at this stage. - October 24-28
- Painting - except trim.
- October 31-November 18
- Installation of trim and flooring.
- November 21-25
- Installation of finish work for electrical and plumbing.
- November 28th
- We move in!!!!
Actually, that's just there to kid Charles. - November 28-January 13
- Complete punch list.
- January 20
- Move date - yippee!!!
Well, now we shall see...
Finishing early is likely not a problem. Coming in late, however, would be a major problem, especially if we sell our house with a mid-January closing date.
Sunday, July 03, 2005
Science of Thermal Mass Effect
Post recovered by Kevin! Many thanks, Kevin!!
Understanding Thermal Mass Effect: The science of why ICF is so energy efficient.
Understanding Thermal Mass Effect: The science of why ICF is so energy efficient.
Saturday, July 02, 2005
Doors: why is this hard? (or: is Home Depot stupid???)
Post recovered by Kevin! Many thanks, Kevin!!
 Last winter, Freda and I found a classy but contemporary looking door on the Masonite web site. We thought this Bellagio door (from the Palazzo series) would look really nice in our new house.
We knew Home Depot (HD) carried Masonite exterior doors, so we went to the nearest HD store and asked about it. Seargent Shultz was working that day and he responded "we know nothing"...
So I called the 800 number for Masonite - and was told that these doors are carried by HD and Rona. Went to HD again, same Sergeant Schultz story! This was frustrating! Masonite was telling us the doors were available at HD but the local store continued to disavow all knowledge.
 One of the advantages of having a dog is that you meet a lot of other people who have dogs. We remembered that we met a person, Robin, who worked in the Widows and Doors section at a nearby HD store (not the closest one), so we made a trek out to that location. Robin said yes, he had heard about these doors (finally!) and they were supposed to be available in Canada in May (this was back in March). Okay we said, we will come back in June (in case there is a delay).
Well, this was the last week of June so we decided to check out the local HD again. Again, Seargent Shultz was there and said they weren't available. We called Robin, and he said they should have some in the store but they were misplaced (unbelievable!) and we should call back in a few days so he could try to track them down.
By this point, I'm not much interested in giving Home Depot more business. (I should mention that I also called Rona but nobody ever called me back.) So I call Masonite again to confirm that HD and Rona are the suppliers, affirmative. Then I ask for the number of the actual distributor so I can find out who sells the product in the Ottawa area. The Masonite call centre lady was really nice but didn't want to give that information out, although she eventually was persuaded after I told her this tale of ineptitude with HD.
So then I call the distributor who, it turns out, covers eastern Ontario but not Ottawa (covered out of the Montreal office). Nevertheless, in about three minutes I have the names of 4 suppliers in Ottawa. I call the two closest ones and find that yes, they do sell these Masonite Palazzo series of doors although they do not stock them. One of these suppliers said they can supply the doors pre-mounted, with three hinges/door and a good quality jamb and stop (not the fast-fit junk), so we are going to drop by that place on Monday to check it out.
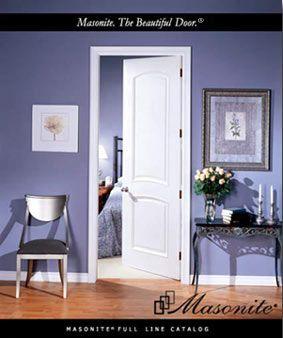 Last winter, Freda and I found a classy but contemporary looking door on the Masonite web site. We thought this Bellagio door (from the Palazzo series) would look really nice in our new house.
We knew Home Depot (HD) carried Masonite exterior doors, so we went to the nearest HD store and asked about it. Seargent Shultz was working that day and he responded "we know nothing"...
So I called the 800 number for Masonite - and was told that these doors are carried by HD and Rona. Went to HD again, same Sergeant Schultz story! This was frustrating! Masonite was telling us the doors were available at HD but the local store continued to disavow all knowledge.
 One of the advantages of having a dog is that you meet a lot of other people who have dogs. We remembered that we met a person, Robin, who worked in the Widows and Doors section at a nearby HD store (not the closest one), so we made a trek out to that location. Robin said yes, he had heard about these doors (finally!) and they were supposed to be available in Canada in May (this was back in March). Okay we said, we will come back in June (in case there is a delay).
Well, this was the last week of June so we decided to check out the local HD again. Again, Seargent Shultz was there and said they weren't available. We called Robin, and he said they should have some in the store but they were misplaced (unbelievable!) and we should call back in a few days so he could try to track them down.
By this point, I'm not much interested in giving Home Depot more business. (I should mention that I also called Rona but nobody ever called me back.) So I call Masonite again to confirm that HD and Rona are the suppliers, affirmative. Then I ask for the number of the actual distributor so I can find out who sells the product in the Ottawa area. The Masonite call centre lady was really nice but didn't want to give that information out, although she eventually was persuaded after I told her this tale of ineptitude with HD.
So then I call the distributor who, it turns out, covers eastern Ontario but not Ottawa (covered out of the Montreal office). Nevertheless, in about three minutes I have the names of 4 suppliers in Ottawa. I call the two closest ones and find that yes, they do sell these Masonite Palazzo series of doors although they do not stock them. One of these suppliers said they can supply the doors pre-mounted, with three hinges/door and a good quality jamb and stop (not the fast-fit junk), so we are going to drop by that place on Monday to check it out.
Bubble wrap == easy peasy
Post recovered by Kevin! Many thanks, Kevin!!

These are the gigantic rolls of bubble wrap. This is used to make it easy to remove the plywood after the main floor is poured. As previously noted, the plywood will be reused as roof sheathing.

These are the gigantic rolls of bubble wrap. This is used to make it easy to remove the plywood after the main floor is poured. As previously noted, the plywood will be reused as roof sheathing.
Thursday, June 30, 2005
Day 84 - starting interior partition layout
Post recovered by Kevin! Many thanks, Kevin!!
Now that the joists and the plywood support for the concrete floor are in place, it is time to layout the interior partitions and prep for the concrete pour. The interior partitions are simply marked on the plywood with a marker, this is because the radiant heat tubing is not installed under a partition - which would simply waste heat and potentially risk puncturing the tubing when the partitions are fastened down.

The wood is the form for the edge of the porch. The outer ICF panel is used to hold in the concrete for the floor. However, since the inner panel is not in place, there are no webs to give the wall any rigidity. The steel stud is used for that purpose, and also to help hold the forms straight.
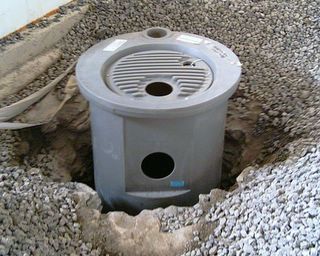
This is the holding tank that we had installed for the future basement bathroom. We are having this roughed in right now, as it will be much more expensive (and disruptive too) to have this done later.
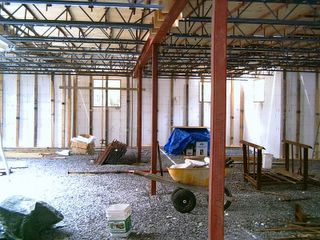
This is a view of the basement. You can see the steel joists with the roll bars holding up the plywood. The finished height in the basement - under the joists - will be almost 8' (7'11').
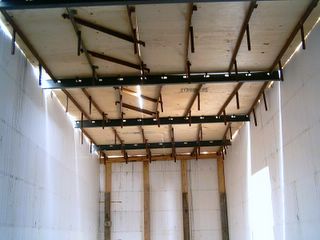
This is the view of the underside of the porch - or the cold storage room, in other words. There are two doors from the basement to the cold storage area. Freda and I both really like squash and are hoping to be able to buy them at harvest time and then keep them in here to enjoy throughout the winter.
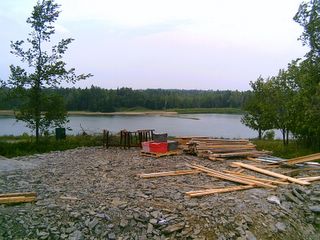
If you turned around when you are facing the future front door, this is the view you would see from the porch. Isn't this a beautiful sight!?!
Now that the joists and the plywood support for the concrete floor are in place, it is time to layout the interior partitions and prep for the concrete pour. The interior partitions are simply marked on the plywood with a marker, this is because the radiant heat tubing is not installed under a partition - which would simply waste heat and potentially risk puncturing the tubing when the partitions are fastened down.
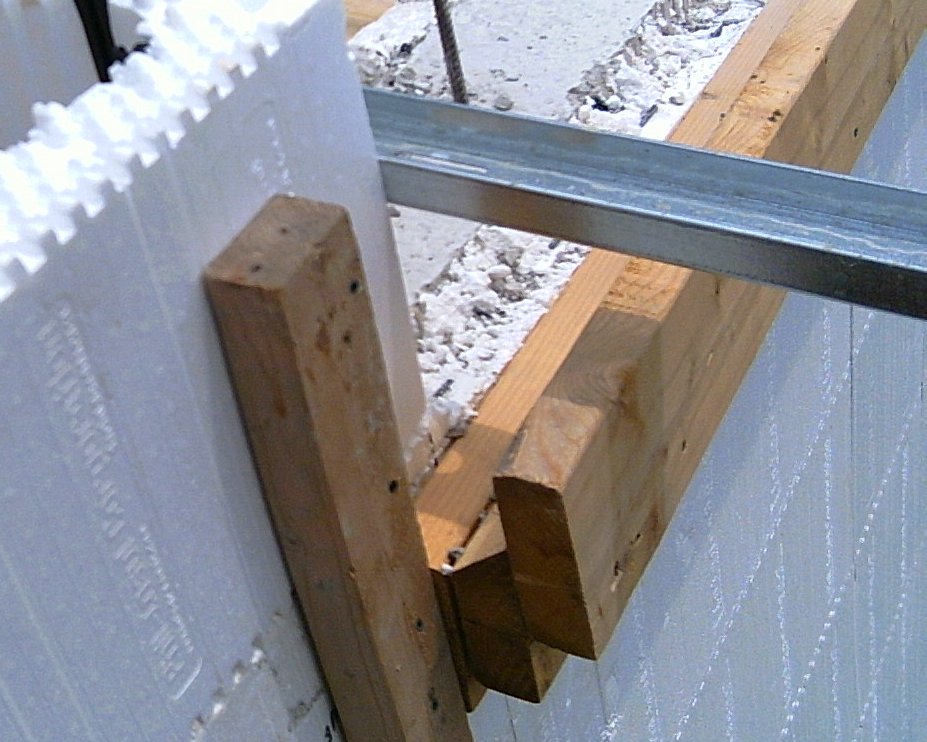
The wood is the form for the edge of the porch. The outer ICF panel is used to hold in the concrete for the floor. However, since the inner panel is not in place, there are no webs to give the wall any rigidity. The steel stud is used for that purpose, and also to help hold the forms straight.
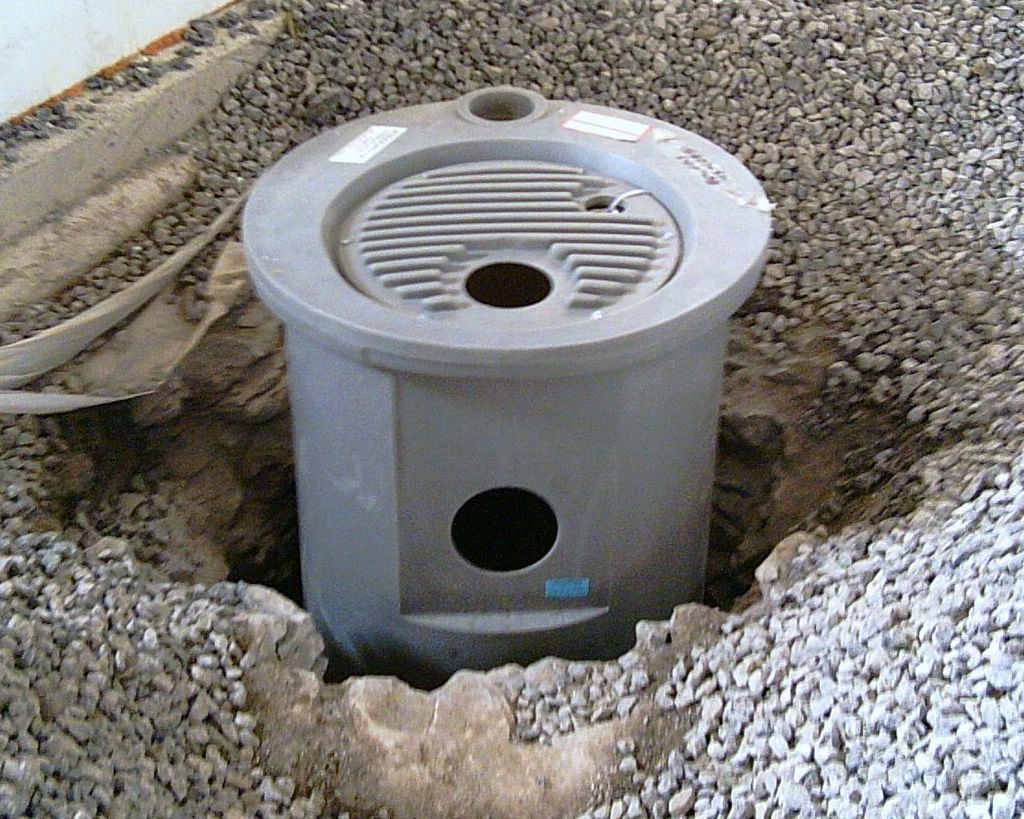
This is the holding tank that we had installed for the future basement bathroom. We are having this roughed in right now, as it will be much more expensive (and disruptive too) to have this done later.
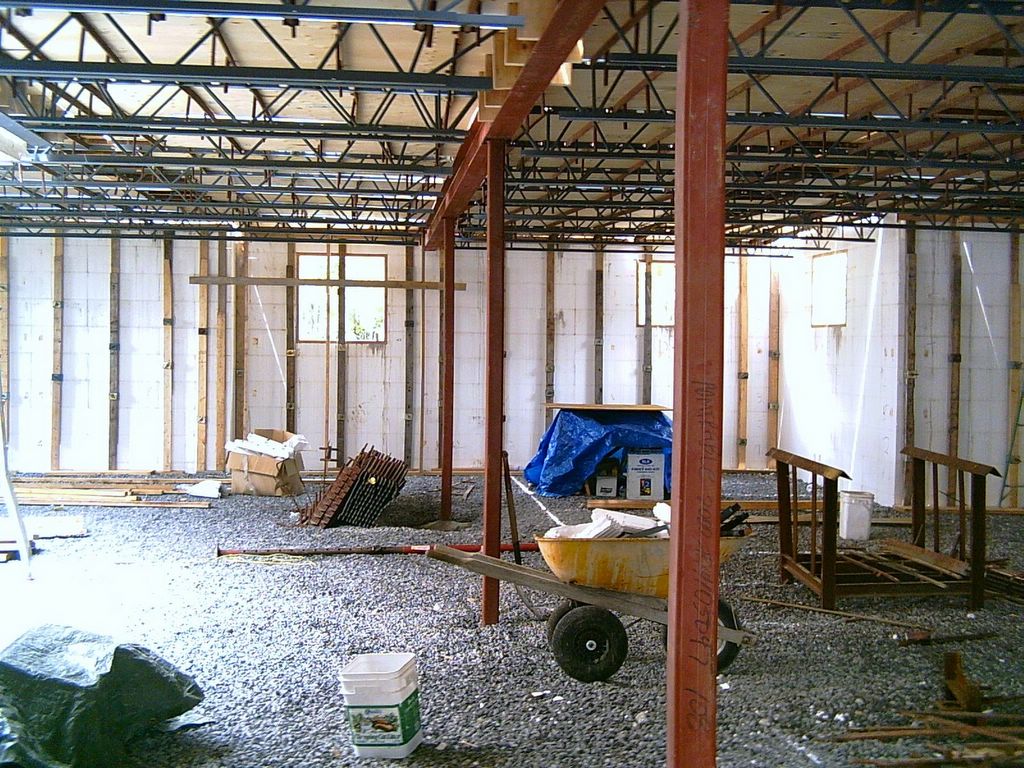
This is a view of the basement. You can see the steel joists with the roll bars holding up the plywood. The finished height in the basement - under the joists - will be almost 8' (7'11').

This is the view of the underside of the porch - or the cold storage room, in other words. There are two doors from the basement to the cold storage area. Freda and I both really like squash and are hoping to be able to buy them at harvest time and then keep them in here to enjoy throughout the winter.
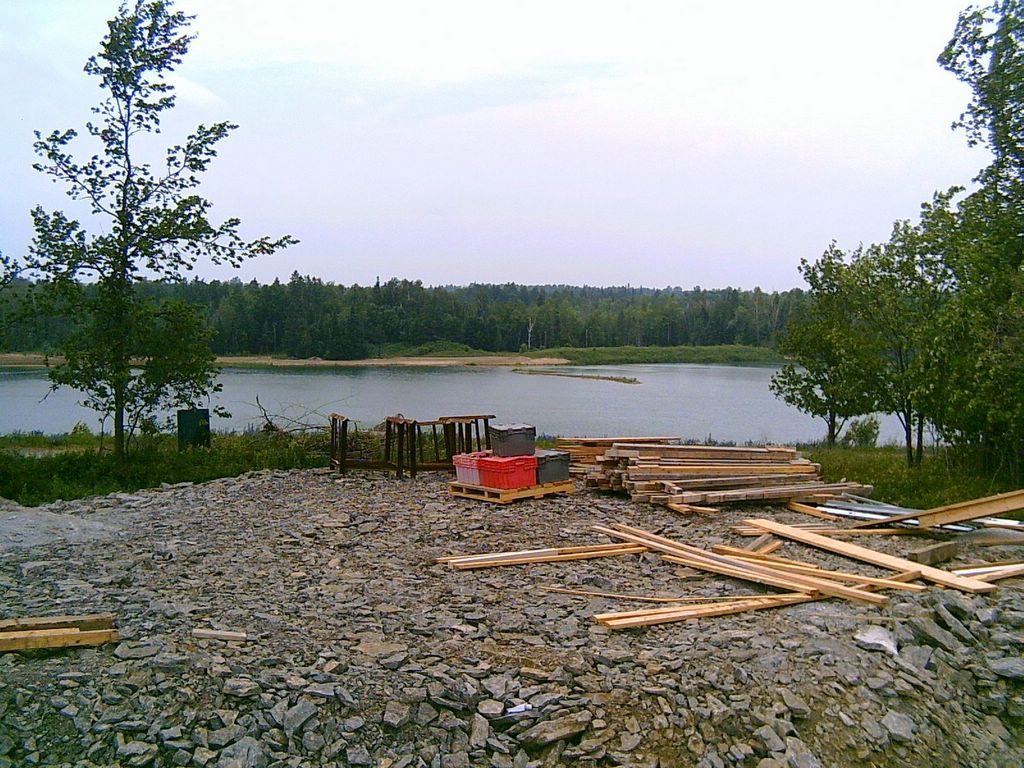
If you turned around when you are facing the future front door, this is the view you would see from the porch. Isn't this a beautiful sight!?!
Subscribe to:
Posts (Atom)